How to Download & Install iVCam for Windows PC?
If you're looking to turn your smartphone into a webcam for your Windows PC, iVCam is one of the best apps you can use. This software allows you to use your mobile device's camera as a high-quality webcam, whether for video calls, streaming, or any other PC-based activity that requires a camera. In this guide, we’ll walk you through the process of downloading and setting up iVCam on your Windows PC device.
What is iVCam?
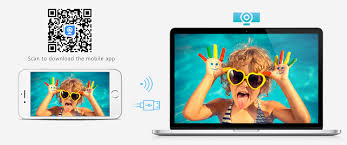
iVCam is an innovative mobile app that allows you to turn your smartphone (either Android or iOS) into a webcam for your Windows computer. This app eliminates the need for an external webcam and lets you use your device's high-quality camera to conduct video calls, record videos, live stream, and more. The app connects your mobile device to your PC through Wi-Fi or USB, offering a smooth, lag-free experience.
Why Use iVCam on Windows PC?
Before diving into the installation process, it’s important to understand why iVCam is an excellent choice for webcam replacement on your Windows PC. Here are some benefits of using iVCam:
High-Quality Video: iVCam can provide HD video, up to 4K resolution, depending on your device's camera and internet connection.
Seamless Connection: The app supports both wireless and USB connections for flexible usage.
Multiple Device Support: You can use iVCam with multiple devices at the same time. It's great for those who need more than one camera for professional streaming or other purposes.
Easy Setup: The installation process is simple, making it a great solution for both beginners and tech-savvy users.
Now that we’ve established what iVCam is and why you should use it, let’s go through the process of downloading and installing it on your Windows PC.
Prerequisites for iVCam Installation
Before you begin the installation, ensure you meet the following requirements:
Operating System: iVCam is compatible with Windows 7, 8, 10, and 11. Make sure your system is updated.
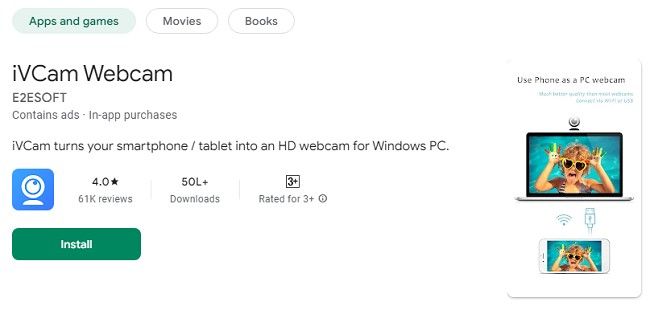
Mobile Device: iVCam supports both Android and iOS devices. You’ll need to download the app on your smartphone from the Google Play Store or Apple App Store.
USB Cable or Wi-Fi: Depending on your preference, you can connect your phone to your Windows PC either via a USB cable or over Wi-Fi. Ensure that both devices are connected to the same Wi-Fi network if you choose the wireless option.
Step-by-Step Guide to Download iVCam for Windows
Step 1: Download and Install iVCam on Your Windows PC
Go to the Official Website: Open your browser and visit the official iVCam website: www.e2esoft.com/ivcam.
Find the Download Button: On the homepage, look for the "Download" section, usually prominently displayed. Click on the Windows Download button to get the installer file.
Run the Installer: Once the setup file has been downloaded, locate the file in your Downloads folder and double-click it to start the installation process.
Install the Software: Follow the on-screen instructions to install iVCam on your Windows PC. The installation process is quick and straightforward.
Launch iVCam on Your PC: Once the installation is complete, open iVCam by clicking on the desktop icon or searching for it in your Start menu.
Step 2: Download iVCam on Your Mobile Device
Go to the App Store: Open the Google Play Store if you have an Android device or the Apple App Store for iOS users.
Search for iVCam: Type "iVCam" in the search bar and locate the iVCam app developed by e2eSoft.
Install the App: Click the Install button to download and install the app on your mobile device. This may take a few moments depending on your internet speed.
Open the App: Once installed, open the iVCam app on your phone.
Step 3: Connect iVCam to Your PC
Now that you’ve installed iVCam on both your Windows PC and mobile device, it's time to connect them.
Using Wi-Fi:
Ensure both your PC and mobile device are connected to the same Wi-Fi network.
Launch the iVCam app on both devices. Your phone should automatically detect your Windows PC if both are on the same network.
The app will display a connection prompt on both devices. Once accepted, your mobile device will begin transmitting video to your PC, effectively turning it into a webcam.
Using USB:
If you prefer a wired connection, connect your mobile device to your Windows PC via USB.
You may need to enable USB debugging on your Android phone or grant necessary permissions on your iPhone.
After a successful connection, iVCam will begin using your mobile device's camera as the webcam for your PC.
Step 4: Adjust Camera Settings
Once connected, you can start using your mobile camera as a webcam. iVCam offers a variety of customization options, including:
Resolution: You can adjust the resolution of the video feed based on your preferences and system performance.
Frame Rate: You can control the frame rate for smoother video.
Zoom: Use the pinch-to-zoom feature to zoom in and out.
Focus: iVCam allows you to manually focus the camera to ensure clarity.
Orientation: You can rotate or flip the camera feed depending on your positioning.
These settings can be accessed via the iVCam software interface on your Windows PC.
Step 5: Start Using iVCam with Applications
Once iVCam is successfully connected, you can use it with popular video conferencing tools and streaming platforms such as:
Zoom
Skype
Google Meet
OBS Studio (for streaming)
Microsoft Teams
Discord
Simply select "iVCam" as your video source in the settings of your desired application. The high-quality video feed from your mobile device will be available for use.
Common Troubleshooting Tips
While the installation process is generally smooth, some users may encounter issues. Below are some common problems and solutions to help you get iVCam up and running:
iVCam Not Connecting:
Ensure both devices are connected to the same Wi-Fi network if using wireless mode.
If using USB, ensure that USB debugging is enabled on your Android device or that necessary permissions are granted on iOS.
Restart both your PC and mobile device if the connection fails.
Video Lag or Poor Quality:
Try reducing the resolution or frame rate settings to lower the demand on your network or PC.
Switch to a USB connection if Wi-Fi performance is unstable.
Ensure no other applications are using the camera on your mobile device or PC.
App Crashes or Freezes:
Check for updates for both the iVCam app and the Windows software.
Reinstall the app if necessary to fix bugs or corruption.
Alternatives to iVCam
While iVCam is a fantastic app, it’s always good to be aware of alternatives. Some other apps that offer similar functionality include:
DroidCam: Another popular app for turning your smartphone into a webcam.
EpocCam: Offers both free and paid versions with wireless connectivity options.
CamON Live Streaming: A good option for Android users looking for high-quality video streaming.
However, iVCam is favored by many users due to its ease of use, excellent video quality, and versatile features.
Additional Tips for Optimal Use
Always check for software updates to ensure you have the latest features and bug fixes.
Keep your device charged, especially when using the USB connection.
Make sure your network is stable for the best wireless performance.
By following the simple steps in this guide, you can easily download and set up iVCam to start using your mobile device as a webcam on your Windows PC.
Conclusion
Downloading and setting up iVCam on your Windows PC is a straightforward process that can significantly enhance your video quality, especially for video conferencing, streaming, or content creation. By following the steps outlined in this guide, you can easily turn your smartphone into a high-quality webcam without the need for additional hardware.
iVCam offers various customization options, flexible connection methods (USB or Wi-Fi), and high-definition video quality, making it a top choice for users looking for an easy-to-use webcam solution. Whether you're working from home, attending online classes, or engaging in professional streaming, iVCam can provide a reliable and high-performance camera solution.
Trending Now
Updates