How To Download & Install iVCam for Mac?
Are you tired of poor-quality webcams and looking for an easy, efficient, and affordable solution to turn your smartphone into a high-quality webcam for your Mac? Look no further than iVCam, a cutting-edge app that allows you to use your iPhone or Android device as a webcam for your Mac. This detailed guide will cover everything you need to know about using iVCam on your Mac device, including its features, installation process, and troubleshooting tips, helping you enhance your video calls, streaming sessions, or recording projects.
What is iVCam?
iVCam is a versatile and reliable webcam app designed to transform your smartphone into a high-quality webcam for your Mac. With this app, you can connect your mobile device to your Mac and use it as a webcam for various applications, such as Zoom, Skype, Microsoft Teams, or any video conferencing software. iVCam provides stunning video quality, multiple resolution settings, and a host of other features that make it a great alternative to traditional webcams.
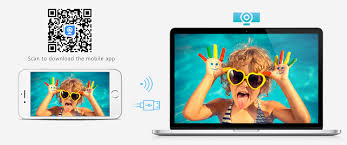
The app works by connecting your phone to your Mac via Wi-Fi or USB, offering both wired and wireless connection options for maximum flexibility. iVCam supports full HD video streaming, real-time camera control, and several customization options, allowing you to enhance your video conferencing experience or stream like a pro.
Why Choose iVCam for Your Mac?
There are many reasons why iVCam is the top choice for Mac users looking to upgrade their webcam setup. Some of the standout features and benefits include:
Superior Video Quality: With iVCam, you can capture high-definition video at up to 4K resolution, ensuring that your video calls, streams, or recordings look crystal clear. The app supports multiple resolution settings, including 1080p, 720p, and 480p, allowing you to choose the optimal quality for your needs.
Easy Setup and Connectivity: iVCam allows you to connect your mobile device to your Mac seamlessly. You can connect via Wi-Fi or USB, depending on your preference. The app automatically detects your device and establishes a connection within seconds, making the setup process incredibly easy.
Multiple Camera Support: You can connect multiple devices to your Mac and use them simultaneously as webcams. This feature is particularly useful for streaming or recording when you need different angles or views. iVCam supports up to four devices connected at the same time.
Real-Time Camera Control: iVCam gives you complete control over your smartphone’s camera. You can adjust settings like zoom, focus, brightness, and white balance in real time, allowing you to optimize your video feed during live sessions.
Wide Compatibility: iVCam is compatible with a wide range of video chat, streaming, and recording software, including Zoom, Skype, OBS, Google Meet, Microsoft Teams, Twitch, YouTube, and more. It can also be used for online classes, video calls, and virtual meetings.
Portrait and Landscape Mode: iVCam allows you to use your phone in both portrait and landscape modes. This versatility enables you to customize your setup based on your preferences or the specific type of content you are creating.
Audio Support: iVCam also allows you to capture audio from your mobile device’s microphone, making it a complete solution for video calls, recordings, and live streams. You can use your phone as both a webcam and a microphone for a streamlined experience.
How to Install iVCam on Your Mac?
Now that you understand the features and benefits of using iVCam on your Mac, let’s walk through the installation process.
Step 1: Download iVCam for Mac
Visit the official iVCam website or the Mac App Store to download the iVCam app for your Mac. You can find the download link on the developer's site for the latest version of the app.
Download and install the iVCam software for Mac. The installation process is straightforward and should only take a few minutes.
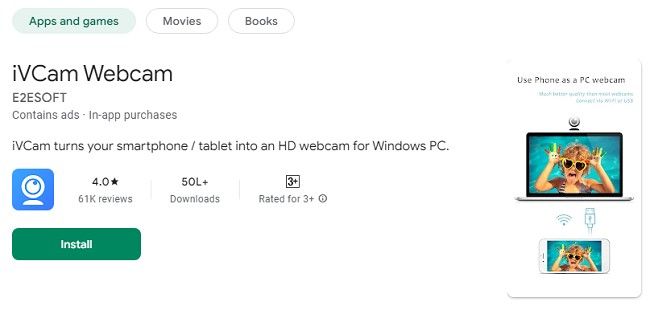
Step 2: Install the iVCam App on Your Smartphone
Open the App Store on your iPhone or the Google Play Store on your Android device.
Search for iVCam and download the app on your smartphone. The app is free to use with some in-app purchases available for premium features.
Once the app is installed, launch it on your smartphone.
Step 3: Connect Your Smartphone to Your Mac
Open the iVCam app on both your smartphone and your Mac.
On your Mac, launch the iVCam software, and it will automatically detect your smartphone once both devices are connected to the same Wi-Fi network. Alternatively, you can connect your phone to your Mac via USB cable for a more stable connection.
Your smartphone's camera feed will now appear on your Mac’s screen. You can choose your mobile device as the video input source in any application that supports webcam use.
Step 4: Configure Settings
Once your phone is connected, you can customize the video settings for optimal performance. You can adjust the resolution, frame rate, and orientation of the video. If you’re using the iVCam app for streaming or recording, you can also adjust focus, zoom, and other settings directly from the iVCam interface.
Troubleshooting iVCam on Mac
While iVCam is designed to be user-friendly, you may encounter occasional issues while using it on your Mac. Here are some troubleshooting tips to help resolve common problems:
1. No Connection Between Devices
Ensure that both your Mac and smartphone are connected to the same Wi-Fi network. If you are using a USB connection, make sure the cable is properly plugged in and functioning.
Restart both devices and try reconnecting.
Check if your firewall or antivirus is blocking the connection.
2. Video Feed Is Lagging
If the video feed is choppy or delayed, try lowering the resolution and frame rate settings in the iVCam app.
Make sure your Wi-Fi connection is stable. For a smoother experience, use a wired connection via USB.
3. Camera Not Detected
Ensure that the iVCam app is open and running on both devices.
Restart the app or reinstall it if the issue persists.
4. Audio Issues
If you’re not hearing any audio, make sure the microphone is enabled in the iVCam app.
Check your Mac’s sound settings to ensure the correct input device is selected.
Additional Features and Customization Options
Video Filters and Effects: iVCam offers a variety of video filters, effects, and backgrounds to make your video feed more dynamic and engaging. You can apply filters in real time to enhance your appearance or add creative effects during live streams.
Touch Focus and Zoom: The app provides an intuitive touch control feature, allowing you to adjust the camera focus and zoom in real time directly from your phone’s touchscreen.
Screen Mirroring: iVCam also supports screen mirroring, allowing you to share your smartphone’s screen with your Mac. This feature is particularly useful for presentations or showing off mobile apps during virtual meetings.
Record Video: iVCam allows you to record videos directly from your smartphone’s camera feed on your Mac, making it ideal for creating tutorials, vlogs, or recording sessions.
iVCam Premium Version
While the free version of iVCam offers a lot of features, the premium version unlocks additional functionalities, including:
Higher resolution and frame rate options
Removal of watermarks on video feeds
Ad-free experience
Access to advanced features like custom video filters and effects
The premium version can be purchased via in-app purchases or through a one-time payment for lifetime access.
Conclusion
iVCam is a powerful app that can significantly enhance your video quality by turning your smartphone into a high-definition webcam for your Mac. With its seamless setup, wide compatibility, and various customization options, iVCam is an excellent solution for video conferencing, live streaming, or video recording. Whether you are a content creator, a professional working from home, or simply someone looking for a better webcam experience, iVCam offers everything you need to improve your video communication. Download iVCam today and start enjoying superior video quality on your Mac!
Trending Now
Updates